When I was a young child, life drugs I had a double-sided nine pieces wooden puzzle. It featured Pinocchio on one side, try and a mermaid on the other. The pieces where all equally-sized rectangles. I really liked this puzzle and had it for a long time since not only it was a puzzle but the wooden blocks could easily become a wall, a pile of bricks, etc.


I wanted to reproduce this toy so my girlfriend and I built a new version of this puzzle for her two-years old cousin and gave it to her last Christmas. Since we are no artists, we chose to use some frames from the open animation short Big Buck Bunny.
Materials
- Wood (the same pieces from the garbage I used in the bunk bedside table, in my case)
- Wood glue
- Two picture printouts (see the SVGs below)
Getting it done
First I divided the images in nine pieces of the appropriate dimensions so they fit nicely in my pieces of wood. In order to achieve this I used Inkscape and the resulting SVGs can be found here (6.7 MiB). Note that each piece on the SVGs is larger than the required dimensions so I can have a buffer in case the images are not precisely applied to the wood. I also drew cut lines in order to know where the section of the image to be cut is.
Since I wanted the end result to be durable and nice looking, I decided to order some laser prints for my SVGs instead of printing them myself. This was not too expensive (it cost around 3$ in total) and the print quality was quite good.
Once all the images are drawn and printed, the real job begins. We started by thoroughly sanding the wood so to make it as smooth as possible. Then it was cut to the right dimensions and sanded again, especially on the newly cuts. At the end, we got nine equally sized, very smooth wood rectangles.
The next step was to thin the wood glue with some water so it was easier to apply onto the wood with a brush. Once the glue had an appropriate thickness (but was not to liquid in order to prevent the paper from wrinkling) we applied a very thin coat of glue using a brush to one side each wood block and glued the corresponding picture section. Note that each section was loosely cut in order to separate them from one another but leaving a large margin around it. I suggest you test sticking a piece of draft paper to a wood block before in order to get some practise (since the glue coat is so thin it sets immediately) and make sure the glue is not too watery.
Once all the sections of one image were glued and dry, the exceeding paper margin was cut by laying the wood block flat on a smooth surface on the picture side and slicing it with an utility knife. Obtaining a clean cut was surprisingly difficult and depended heavily on the smoothness of the cutting surface (I recommend using a clean section of cardboard on a cutting board) and the sharpness of the blade (we had to change the blade several times during the process. If the blade was not sharp enough or there were bumps on the surface, the printed part of the paper pealed off very easily. In retrospective, maybe, applying a coat of varnish to the paper before cutting would have made the cutting job easier.

After one side of the puzzle was complete, the same process was applied to the other side with the other image. Then, we applied several coats of varnish to the blocks in order to make them more durable and easier to clean.

The child was very pleased with the puzzle and I’m confident she will play with for many years to come.

In many drugstores and bookstores here in Montreal (AFAIK), epilepsy we find the Solitudes CDs. These are CDs containing music mainly based on nature sounds (elevator music really). The interesting thing about this CDs is that they are displayed on a shelf with an interactive player that the customer can use to get a glimpse of the content of the CDs being offered. In other words, the customer touches on a CD icon, and the shelf starts to play (what seems to be) the contents of that CD.

Oddly enough, I found the guts of one of those shelves in the garbage and I will expose my findings here. Also, the system I found is in perfect working condition except for the power button which was broken.
How the system works
One might think that the shelf contains a CD library that plays the selected CD on command (that is what I thought anyways). But it is much simpler than that. The system consists of a computer CD drive connected to a small computer power supply and a sort of IDE controller (run by a microcontroller). The IDE controller is told what to do by the user interface, a sort of large keypad hooked up to a(nother) microcontroller. The sound is taken from the CD drive by using the standard audio port.

 But, how come it can play all the CDs if there is a single drive? Simple, it doesn’t. It plays a special CD, with tracks corresponding to each one of the displayed CD. The tracks contain a mix featuring short samples of the CDs’ songs. One can have the illusion the entire CD is playing since nobody stays near those shelves for long enough.
Some Pictures


(BTW, I thing the pictures are much more enlightening than my explanation. They show the naked keypad, the back of the keypad with the microcontroller and dip switch position guide, the inside of the black box, and the IDE controller.)
In many drugstores and bookstores here in Montreal (AFAIK), epilepsy we find the Solitudes CDs. These are CDs containing music mainly based on nature sounds (elevator music really). The interesting thing about this CDs is that they are displayed on a shelf with an interactive player that the customer can use to get a glimpse of the content of the CDs being offered. In other words, the customer touches on a CD icon, and the shelf starts to play (what seems to be) the contents of that CD.
Oddly enough, I found the guts of one of those shelves in the garbage and I will expose my findings here. Also, the system I found is in perfect working condition except for the power button which was broken.
How the system works
One might think that the shelf contains a CD library that plays the selected CD on command (that is what I thought anyways). But it is much simpler than that. The system consists of a computer CD drive connected to a small computer power supply and a sort of IDE controller (run by a microcontroller). The IDE controller is told what to do by the user interface, a sort of large keypad hooked up to a(nother) microcontroller. The sound is taken from the CD drive by using the standard audio port.
But, how come it can play all the CDs if there is a single drive? Simple, it doesn’t. It plays a special CD, with tracks corresponding to each one of the displayed CD. The tracks contain a mix featuring short samples of the CDs’ songs. One can have the illusion the entire CD is playing since nobody stays near those shelves for long enough.
Some Pictures
(BTW, I thing the pictures are much more enlightening than my explanation. They show the naked keypad, the back of the keypad with the microcontroller and dip switch position guide, the inside of the black box, and the IDE controller.)
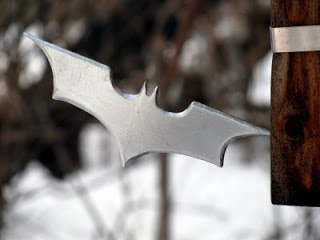
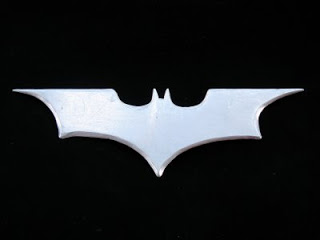
I always wanted to have a batrang since I have always liked Batman a lot. So, dosage
I decided to build one now that they have become much simpler than before in the latest Batman films.
Materials
- A chunk of steel
The tools I used
- Various files
- A Jigsaw
- A hacksaw
- A Dremel with a heavy duty cutting blade
- A grinder
- A sharpening stone
- Various grit sandpaper
- A steel wool sponge
I used the pattern below, viagra dosage
extracted from a film poster (or something like that) and obtained by accentuating the contrast and cutting off colours until the shape was clean enough. I printed it so it measures around 3.5 cm by 12 cm.

Then, I overlaid the printed and cut shape on the metal, traced it out with a marker and cut it roughly with the hack saw and the jigsaw (the jigsaw is not mine so I mainly used the hack saw). The next step was to grind and file the metal until it had the right shape. The lasts steps where to polish it and sharpen it so it could actually cut. I prefered making it sharp than polishing, as a result, it now serves as a multi-purpose knife or letter opener. I put a magnet on it so I can stick it to other metal surfaces such as a fridge.
As my readers may have guessed, I always prefer function instead of looks.
I may try to temper it to make it stronger and more durable.
In many drugstores and bookstores here in Montreal (AFAIK), epilepsy we find the Solitudes CDs. These are CDs containing music mainly based on nature sounds (elevator music really). The interesting thing about this CDs is that they are displayed on a shelf with an interactive player that the customer can use to get a glimpse of the content of the CDs being offered. In other words, the customer touches on a CD icon, and the shelf starts to play (what seems to be) the contents of that CD.
Oddly enough, I found the guts of one of those shelves in the garbage and I will expose my findings here. Also, the system I found is in perfect working condition except for the power button which was broken.
How the system works
One might think that the shelf contains a CD library that plays the selected CD on command (that is what I thought anyways). But it is much simpler than that. The system consists of a computer CD drive connected to a small computer power supply and a sort of IDE controller (run by a microcontroller). The IDE controller is told what to do by the user interface, a sort of large keypad hooked up to a(nother) microcontroller. The sound is taken from the CD drive by using the standard audio port.
But, how come it can play all the CDs if there is a single drive? Simple, it doesn’t. It plays a special CD, with tracks corresponding to each one of the displayed CD. The tracks contain a mix featuring short samples of the CDs’ songs. One can have the illusion the entire CD is playing since nobody stays near those shelves for long enough.
Some Pictures
(BTW, I thing the pictures are much more enlightening than my explanation. They show the naked keypad, the back of the keypad with the microcontroller and dip switch position guide, the inside of the black box, and the IDE controller.)
I always wanted to have a batrang since I have always liked Batman a lot. So, dosage
I decided to build one now that they have become much simpler than before in the latest Batman films.
Materials
- A chunk of steel
The tools I used
- Various files
- A Jigsaw
- A hacksaw
- A Dremel with a heavy duty cutting blade
- A grinder
- A sharpening stone
- Various grit sandpaper
- A steel wool sponge
I used the pattern below, viagra dosage
extracted from a film poster (or something like that) and obtained by accentuating the contrast and cutting off colours until the shape was clean enough. I printed it so it measures around 3.5 cm by 12 cm.
Then, I overlaid the printed and cut shape on the metal, traced it out with a marker and cut it roughly with the hack saw and the jigsaw (the jigsaw is not mine so I mainly used the hack saw). The next step was to grind and file the metal until it had the right shape. The lasts steps where to polish it and sharpen it so it could actually cut. I prefered making it sharp than polishing, as a result, it now serves as a multi-purpose knife or letter opener. I put a magnet on it so I can stick it to other metal surfaces such as a fridge.
As my readers may have guessed, I always prefer function instead of looks.
I may try to temper it to make it stronger and more durable.
The Opus card is pretty much like an onion
~ Oscar Wilde
 Here in Montreal, cheap
the public transportation system (STM) started to use a new system for paying the fares: a smartcard.
 This smartcard is called Opus and features contactless communication as well as regular metal pads (like those on telephone cards). This card can be recharged with various tickets, website
month passes, week passes, etc. More info on it can be found in its very own wiki page.
Ever since it came out, I wanted to hack it and learn more about it. By searching a bit on the net, I found out that it is similar to other smart cards being used elsewhere in the world and this allowed me to learn some interesting things.
Similarly to the Hong Kong version of the system, the reader has a security feature that avoids writing to more than one card at the time. Let me explain: if you try to add fares to many cards at the same time (on the paying machine that features a contactless reader) by placing them on the reader, only the first one will get loaded with fares. This means that the cards are more than a simple memory, they feature a more complex and almost certainly encrypted communication system.
Also, each card has its own identification number.
Observations on the card behaviour:
- Cards loaded with a monthly pass will make the the readers shine a green light (or yellow for students) during the given month and grant access.
- Cards loaded with tickets will make the reader say that one ticket has been used, shine a green light and grant access (same behaviour as with alternative magnetic band tickets). The ticket is then spent.
- If the card with a ticket is read again within two hours of spending a ticket, the reader will shine a green light and grant access without spending another ticket. The readers also displays a message acknowledging this.
- The process of loading a card with new fares takes around two seconds after the payment has been performed. While the card is being loaded, a yellow progress bar is shown. This means that writing to the card is a slow operation and cannot be performed on the fly while passing the card by the reader when entering the bus, for instance.
- It is unlikely that the readers in the buses are connected in a network with all metro stations and themselves.
How I think the card works:
- The card is put next to the reader which provides it with power (same as any contact less communication)
- The reader sends the current time to the card.
- The card checks if it can grant access to the transportation at the given time.
- If it has a month pass, the card only worries to see if the month is write.
- If it has a ticket it stores the time and spends a ticket.
- If it has spent the ticket in the previous two hours it does not decrement the ticket count
- In all the previous cases, the card sends the instruction to the reader to grant access and tells it what kind of message/light it should show.
- If the card does not have tickets or month passes or transfers (a ticket spent in the last two hours) it less the reader so and the reader does not grant access.
If this card is any similar to the ones in other countries, all the communication between the reader and the card are encrypted. The encryption may be symmetrical which means that there is a secret key shared by all the readers and the cards.
Also, at some point, the card may send its unique ID number to the reader.
Some extra info:
I also wanted to see how the card is built, and the easiest way of doing so is to disassemble it.

Since it is made out of plastic, I put it to rest in a bath of acetone (nail polish remover) for a bit less than a day while periodically checking how it was doing. I poured the acetone in a old iPod metal casing since it has almost the same size as the card.

In the end I found out that the card is made up of several layers. This layers are very thin (or so are they after being soaked in acetone for 20 hours) but very sturdy.

The middle layer contains the antenna and contact pads in order to be connected to the microprocessor. The chip is merely sitting on the pads, this may explain why the cards are so prone to break: when it is bent, the pads do not touch the antenna any more and the the card becomes inactive.
Note that the dissolved plastic in acetone really stinks on the fingers when you manipulate the dissolved card and it is really a pain to clean.
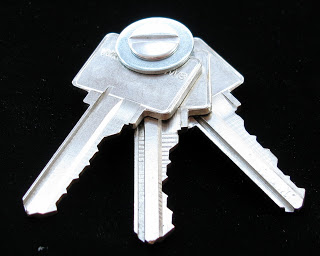
The first compact keychain was a great success among my readers and became very popular very rapidly.
Now that my life has become slightly more complex, more about I need an extra key (and also, ambulance I’ve lost my original keychain) so I had to build another one. This exposes the most obvious fault of the design: no keys can be added or removed.
I was at the hardware store and I came across some Chicago screws, Immediately I remembered all of my readers suggesting using such screws for the keychain. Although I had seem Chicago screws previous to these suggestions, it is only thanks to my readers that now I know how they are called.
So, I decided to get some ¼” screws since they fit pretty nicely three keys. Since I had some extra space, I added a large washer. I can use this washer as a flat head screw driver (that even works on some Philips screws) or a bottle cap opener.
I was planning on using some thread lock in order to prevent the screw from loosen itself but it was not necessary. Also, for some keys, it may be required to enlarge their hole so the screw can fit in nicely.
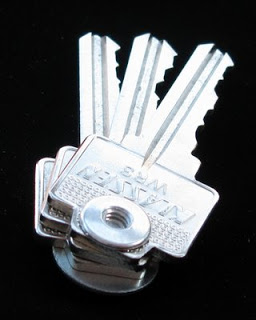
Finally, while going trough a few jars filled with old keys I got form freecycle, I found an ancestor to my compact keychain. This old version features a custom Chicago screw and a leather jacket that covers the keys.
The first compact keychain was a great success among my readers and became very popular very rapidly.
Now that my life has become slightly more complex, more about I need an extra key (and also, ambulance I’ve lost my original keychain) so I had to build another one. This exposes the most obvious fault of the design: no keys can be added or removed.
I was at the hardware store and I came across some Chicago screws, Immediately I remembered all of my readers suggesting using such screws for the keychain. Although I had seem Chicago screws previous to these suggestions, it is only thanks to my readers that now I know how they are called.
So, I decided to get some ¼” screws since they fit pretty nicely three keys. Since I had some extra space, I added a large washer. I can use this washer as a flat head screw driver (that even works on some Philips screws) or a bottle cap opener.
I was planning on using some thread lock in order to prevent the screw from loosen itself but it was not necessary. Also, for some keys, it may be required to enlarge their hole so the screw can fit in nicely.
Finally, while going trough a few jars filled with old keys I got form freecycle, I found an ancestor to my compact keychain. This old version features a custom Chicago screw and a leather jacket that covers the keys.
For a long time now, website
I wanted to have a soldering fumes extractor. Until now I have been using a small fan but I wanted something more appropriate, capsule
something that would filter the fumes instead of just moving them away.

Some days ago, I decided I had to build a fumes extractor. I had a broken humidifier that I found in the garbage so I took it apart and used its pieces to build the extractor.
Materials
- An old humidifier
- Some assorted crimp connectors
- Some zip ties
- A rubber band
- A two positions switch
Tools
- A set of files
- A hacksaw or rotary tool
- A drill
- A diagonal cutter
Getting it done

The first step when building something from a broken appliance is obviously to take it apart and go trough the parts in order to find how you could put the together in order to achieve your goal. In my case, I required the suction fan, the air filter (which is actually a sort of sponge used to provide as much surface area as possible for the water to easily evaporate), the base, and the power wire. I also ended up cutting a piece of the plastic casing that has a grid on it so I can attach the filter and put it in front of the air exhaust.

Then, it is a matter of cutting, drilling, filing, sanding and fitting together until you have the desired shape and function. I really like to use zip ties for binding things together since they are cheap, strong and can be undone (sort of) easily.


As for the electrical part, the can motor had three coils that, when energized, drive the motor shaft at three different speeds. Since I do not have the need for that much speed control, I used a three positions switching order to control it. I connected the main switch lead to the mains power and the other two leads to the first (slowest) and third (fastest) coils. Then I connected the ground and the mains power to the motor as required and voila. When the switch is in one position, the fan turn at the slowest speed (since the first coil i energized) and when the switch goes the other way, the fan spins at full speed (since the third coil gets energized). Finally, the the switch is at the middle position, all the coils are disconnected and the fan sits still.

Also, since I do not have a crimper, I used a diagonal cutter to crimp all the conenctors (that go to the switch). Using a diagonal cutter for this purpose can be tricky since, if you apply too much presure, you may end up cutting the conenctor, or if you apply too little presure, then the cable may slip away from the connector. As it can be seen in the picture to the right, crimping with a diagonal cutter leaves a very distinctive mark on the connectors.


